既にローカルでgit管理しているものをgithubにpushする
想定している状況
- とりあえず、ローカルで開発をしていた
- もちろん、git initして、作業毎にgit commitをしている
- ブランチは切ってなくて、masterブランチで作業している
- 一通り実装したので、githubに公開しようと思った
- githubでリポジトリを作ったけど、どうやってpushしていいかわからん
- githubでリポジトリを作った時の、LICENSEやらREADME.mdは残しておきたい*1
手順
github上でSSHのclone URLをコピーしてきます。
例:git@github.com:noboru-i/irkit.git
git管理しているディレクトリにて、下記のコマンドを実行します。
git remote add origin git@github.com:noboru-i/irkit.git
git fetch
これにより、origin/masterとして、github上のmasterブランチを参照できるようになりました。
なので、origin/masterを、ローカルのmasterにリベースします。*2(masterブランチをチェックアウトしている前提)
git rebase origin/master
これで、ローカルのmasterブランチはLICENSEやらREADME.mdが存在している状態になります。
なので、これをpushします。
git push origin master

一本道になりました。
一番左のコミットがgithubで自動的にコミットされたもので、それ以降のものがローカルでコミットしていたものです。
時系列はひっくり返ってしまいますが、意味的にはこんな感じでいいんじゃないでしょうか?
ちなみに、mergeしたらこんな感じに、入り口2つになったので、なんか微妙だなーと。

もっといいやり方があるような気はします。
余談
マージしてpushしちゃったあとの復旧方法は下記の通りです。
git reset --hard c62d6a3
git co -b o_master
git reset --hard e14b7566ca35c5910dd0769d3bdadb59f1499231
git push -f origin o_master:master
git co master
git b -d o_master
- c62d6a3:1個前(margeする前)のコミット
- e14b7566ca35c5910dd0769d3bdadb59f1499231:githubの初期コミット
なにをやっているかというと、下記のような感じ。
- masterのマージコミットを破棄
- o_masterブランチにて、元のorigin/master を再現し、強制push
- masterをチェックアウトしなおし、不要になったo_masterブランチを削除

- 作者: 松下雅和,船ヶ山慶,平木聡,土橋林太郎,三上丈晴
- 出版社/メーカー: シーアンドアール研究所
- 発売日: 2014/04/09
- メディア: 単行本(ソフトカバー)
- この商品を含むブログ (4件) を見る

GitHub実践入門 ~Pull Requestによる開発の変革 (WEB+DB PRESS plus)
- 作者: 大塚弘記
- 出版社/メーカー: 技術評論社
- 発売日: 2014/03/20
- メディア: 単行本(ソフトカバー)
- この商品を含むブログ (5件) を見る
Bootstrap3ベースの管理画面を作る
まずは、Railsアプリケーションの作成。
- irkitというプロジェクト名
- unit testをスキップ
- データベースはsqlite3
- bundle installを行わない
rails new irkit -T -d sqlite3 --skip-bundle
cd irkit
とりあえず、git管理下に置きましょう。
git init
git add .
git commit
Gemfileに下記を追加します。
# 認証処理
gem 'devise', '~> 3.2.4'

# bootstrap
gem 'bootstrap-sass', '~> 3.1.1.1'
gem 'bootstrap-sass-extras', '~> 0.0.6'
vendor/bundle以下にbundle install。
bundle install --path=vendor/bundle
.gitignore に下記を追加します。
/vendor/bundle
また、一旦gitにコミットします。
git add .
git commit
deviseの設定を行います。
rails generate devise:install
rails generate devise user
bundle exec rake db:migrate
rootページが必要なので、controllerを作成します。
rails generate controller welcome index
config/routes.rb にコメントがたくさん書いてあるのを消して、下記のようにします。
Rails.application.routes.draw do

  root 'welcome#index'

  devise_for :users

  get 'welcome/index'
end
app/controllers/application_controller.rb を下記のようにします。
class ApplicationController < ActionController::Base
  # Prevent CSRF attacks by raising an exception.
  # For APIs, you may want to use :null_session instead.
  protect_from_forgery with: :exception

  before_action :authenticate_user!
end
とりあえず、一回サーバを起動してみます。
rails s
http://localhost:3000/ にアクセスして、 http://localhost:3000/users/sign_in にリダイレクトされ、認証画面が出て来れば、とりあえずOKです。
次に、bootstrapの設定です。
app/assets/stylesheets/application.css を application.css.scss にリネームし、下記を追加します。
@import "bootstrap";
app/assets/javascripts/application.js のrequire部分を下記のようにします。
//= require jquery
//= require jquery_ujs
//= require turbolinks
//= require bootstrap
//= require_tree .
bootstrapの設定を行います。
app/views/layouts/application.html.erb がコンフリクトしていると言われますが、y で。
rails g bootstrap:install
rails g bootstrap:layout application fluid
エラーメッセージがぎりぎりに出てくるのが嫌なので、application.css.scss で全体的にずらします。
body {
  padding-top: 70px;
}
というより、deviseの画面でメニューとかが出てるのがおかしいので、layoutを変えます。
app/controllers/application_controller.rb を下記のように変更します。
class ApplicationController < ActionController::Base
  # Prevent CSRF attacks by raising an exception.
  # For APIs, you may want to use :null_session instead.
  protect_from_forgery with: :exception

  before_action :authenticate_user!

  layout :layout_by_resource

  protected

  def layout_by_resource
    if devise_controller?
      "devise"
    else
      "application"
    end
  end
end
app/views/layouts/devise.html.erb を作成します。
基本的には、app/views/layouts/application.html.erb をコピペ。
<!DOCTYPE html> <html lang="en"> <head> <meta charset="utf-8"> <meta http-equiv="X-UA-Compatible" content="IE=Edge,chrome=1"> <%= viewport_meta_tag %> <title><%= content_for?(:title) ? yield(:title) : "Irkit" %></title> <%= csrf_meta_tags %> <!-- Le HTML5 shim, for IE6-8 support of HTML elements --> <!--[if lt IE 9]> <script src="//cdnjs.cloudflare.com/ajax/libs/html5shiv/3.6.1/html5shiv.js" type="text/javascript"></script> <script src="//cdnjs.cloudflare.com/ajax/libs/respond.js/1.3.0/respond.js" type="text/javascript"></script> <![endif]--> <%= stylesheet_link_tag "application", :media => "all" %> <!-- For third-generation iPad with high-resolution Retina display: --> <!-- Size should be 144 x 144 pixels --> <%= favicon_link_tag 'apple-touch-icon-144x144-precomposed.png', :rel => 'apple-touch-icon-precomposed', :type => 'image/png', :sizes => '144x144' %> <!-- For iPhone with high-resolution Retina display: --> <!-- Size should be 114 x 114 pixels --> <%= favicon_link_tag 'apple-touch-icon-114x114-precomposed.png', :rel => 'apple-touch-icon-precomposed', :type => 'image/png', :sizes => '114x114' %> <!-- For first- and second-generation iPad: --> <!-- Size should be 72 x 72 pixels --> <%= favicon_link_tag 'apple-touch-icon-72x72-precomposed.png', :rel => 'apple-touch-icon-precomposed', :type => 'image/png', :sizes => '72x72' %> <!-- For non-Retina iPhone, iPod Touch, and Android 2.1+ devices: --> <!-- Size should be 57 x 57 pixels --> <%= favicon_link_tag 'apple-touch-icon-precomposed.png', :rel => 'apple-touch-icon-precomposed', :type => 'image/png' %> <!-- For all other devices --> <!-- Size should be 32 x 32 pixels --> <%= favicon_link_tag 'favicon.ico', :rel => 'shortcut icon' %> <%= javascript_include_tag "application" %> </head> <body> <div class="container"> <%= bootstrap_flash %> <%= yield %> <footer> <p>© Company 2014</p> </footer> </div> <!-- /container --> </body> </html>
とりあえず、もう一回コミットしておく。
git add .
git commit
deviseのviewをファイルに出力しておきます。
rails generate devise:views
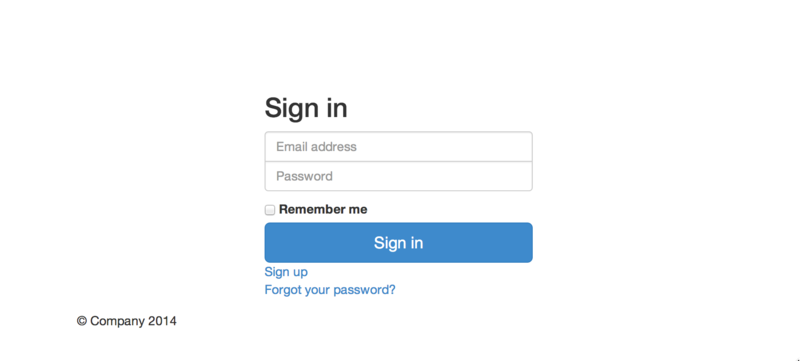
ためしに、app/views/devise/sessions/new.html.erb を下記のように書き換えます。
(基本的に、 http://getbootstrap.com/examples/signin/ のパクリ)
<%= form_for(resource, as: resource_name, url: session_path(resource_name), html: {role: 'form', class: 'form-signin'}) do |f| %>
  <h2>Sign in</h2>
  <%= f.email_field :email, autofocus: true, class: 'form-control', required: true, placeholder: 'Email address' %>
  <%= f.password_field :password, class: 'form-control', required: true, placeholder: 'Password' %>

  <% if devise_mapping.rememberable? -%>
    <div><%= f.check_box :remember_me %> <%= f.label :remember_me %></div>
  <% end -%>

  <div><%= f.submit "Sign in", class: 'btn btn-lg btn-primary btn-block' %></div>

  <%= render "devise/shared/links" %>
<% end %>
なんとなく、それっぽくなります。

あと、jsとcssがバラバラにダウンロードされると、ログがウザいので、 config/environments/development.rb を変更します。
config.assets.debug = false
適当なモデルを作成します。
rails g scaffold command name:string json:text
bundle exec rake db:migrate
rails g bootstrap:themed commands
app/views/layouts/application.html.erb のli部分を下記に変更します。
ついでに、"col-md-3"で作成されているサイドバー部分を削除します。
<li><%= link_to "command", commands_path %></li>
あと、ボタンの文字色が変なので、app/assets/stylesheets/scaffolds.css.scss にある下記のaタグの部分を削除します。
a {
  color: #000;
  &:visited {
    color: #666;
  }
  &:hover {
    color: #fff;
    background-color: #000;
  }
}
なんとなくデータを入れると、それっぽく見えます。

とりあえず、ここまでの作業時点のタグは下記の通り。 https://github.com/noboru-i/irkit/tree/hatena-20140505
メモ取りながら開発するって、凄い疲れる。。。

Ruby on Rails 4 アプリケーションプログラミング
- 作者: 山田祥寛
- 出版社/メーカー: 技術評論社
- 発売日: 2014/04/11
- メディア: 大型本
- この商品を含むブログを見る

RailsによるアジャイルWebアプリケーション開発 第4版
- 作者: Sam Ruby,Dave Thomas,David Heinemeier Hansson,前田修吾
- 出版社/メーカー: オーム社
- 発売日: 2011/12/01
- メディア: 単行本(ソフトカバー)
- 購入: 12人 クリック: 206回
- この商品を含むブログ (39件) を見る